Stable
1.9.9774
Daily-driver build with the safest release cadence.
- Updated
- 7 weeks ago
- File Size
- 515.39 MB
- Release Notes
- Open notes
Stable is the recommended track for most users. Alpha gets you the newest capabilities first.
Daily-driver build with the safest release cadence.
Fastest release track with the newest features and experiments.
Every release stays linked here so you can inspect what changed before you switch versions.
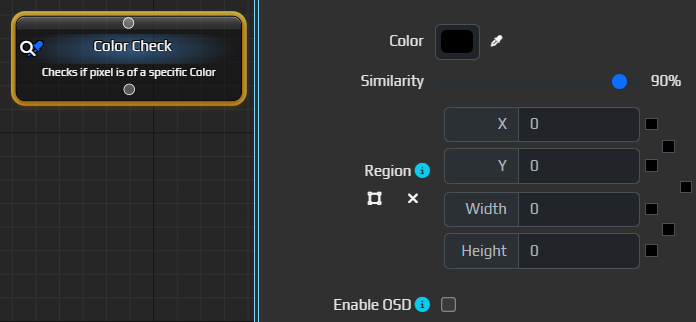
Позволяет проверять, совпадает ли цвет выбранного пикселя (или области) с заданным.
Вероятно, один из самых полезных узлов: быстрый, очень простой в использовании и гибкий.
Позволяет искать изображение на экране или в выбранной области.

Добавлен новый узел для тех, кому удобнее строить логику в более «классическом» стиле.


Новый узел для BT и макросов, который позволяет запускать ML-поиск по области экрана или окна.
Сейчас в нем еще не хватает ряда настроек, которые уже есть в MLSearchTrigger, например порогов Configende/IoU, метода инференса, количества потоков и т. д. Эти параметры будут добавлены в ближайшее время.
Важно: сам по себе этот узел ничего не делает — его нужно использовать в паре с другими узлами, например MLFindClass или MouseMove, чтобы получить практический результат.
По умолчанию он выбирает самый первый найденный объект и делает его доступным для клика через MouseMove. Для очень простых сценариев этого достаточно, а для более сложных лучше использовать MLFindClass.
Узел вернет Success только в том случае, если найден хотя бы один prediction.

Этот узел нужно использовать вместе с MLSearch. Он позволяет выбрать нужный класс (~объект) из результатов, которые возвращает MLSearch. Можно задать параметры фильтрации: имя класса (или несколько имен), минимальный порог confidence, ограничения по размеру и т. д. Все predictions, которые не подходят под эти условия, будут отфильтрованы.
Из predictions, оставшихся после фильтрации, узел может выбрать ровно один объект — например, первый в списке, объект с максимальным confidence или тот, который сейчас находится ближе всего к курсору.
Узел вернет Success только в том случае, если найден хотя бы один prediction, подходящий под все критерии.
Разумеется, и MLSearch, и MLFindClass можно комбинировать с любыми другими узлами. Вот, например, выбор цели на основе приоритета:

Let's welcome a new node which is accessible in Macros and BTs. It is the first one in the batch of nodes coming soon, nodes, focusing on computer-vision. Those nodes will be a direct replacement of triggers, which you're currently using in Auras. Migration process will take a lot of time and probably new Nodes will reach feature parity with corresponding Triggers only months from now, but eventually we'll get there.
Note, that Nodes DO NOT tick on their own. Image capture and analysis happens exactly at the same moment when the node gets executed.

Initially, performance of nodes could be worse than those that we had in Triggers - this is due to new mechanisms which were implemented for Computer Vision API which powers those new nodes.
New Nodes will be writing their results to Variables which are available via Bindings.
For now, there is a single variable CvLastFoundRegion which will contain the last found region. This could be coordinates of a found pixel. Or coordinates of found image. Or ML class.

In MouseMove, there is now a new button, which allows to very quickly and easily use that variable as a source of coordinates.

Just click on the button, and, when executed, MouseMove will try to read coordinates from that variable.

Implementing a first prototype of the system which should allow to use CV API in BTs and Macros. The general idea is that now those methods which you call, be it ImageSearch/ColorSearch/etc, will cache underlying capture/processing mechanisms, which should make consequent similar calls from other parts of the program be much-much cheaper. We're talking seconds VS milliseconds here.
The mechanism tries to track which parts of the program use different parts of CV API and cache them accordingly. Monitor memory usage! Usually such systems tend to memory leak. A lot. Especially until properly tuned.
This API by itself is still very rough on edges and will be improved in upcoming releases.
This method is now part of Computer Vision API and allows to entirely bypass caching mechanism if you do not need it - e.g. your entire program is a single C# script. In that case it does not make sense to rely on EA caching mechanisms and pay extra (yet small) price for it
Clear() method to MiniProfilerin the latest version I've enabled nodes such as Cooldown/Selector/Sequence for use in Macros as well. The assumption was that it will allow to create rotations a bit easier and bring in BT-goodies to Macros as well. First testing has shown, that this functionality still needs more time in the oven as it raises too many questions, especially around drag'n'drop functionality.
I've disabled those nodes for now and they will become available later, as soon as UX around them will be ready.
The macro system has received significant upgrades, expanding both its functionality and the number of supported operations. In practice, behavior trees have proven to be fairly complex to grasp, while Macros were always meant to occupy the niche between very simple auras and more sophisticated behavior trees. These changes aim not only to reinforce that position but also to incorporate many of the strengths from both Auras and Trees.
Let’s dive in:
This is the core concept from the Auras system. When something happens, a trigger fires. Then, in the aura, the following blocks are called sequentially:
This combination of blocks can describe many situations and automate gameplay. However, it often lacked flexibility — for example, it wasn’t possible to add additional conditions within blocks or repeat actions multiple times. Auras simply weren’t designed for that, but these features are fundamental to Macros.
The one thing Macros were missing was the ability to check their own current state — to know whether they should be active at a given moment.
CheckIsActiveThis is where the new node CheckIsActive comes in. Its sole purpose is to let the macro body check if the macro is currently active. Just this node alone allows Macros to replicate the exact logic that Auras used for years.
There are many possible ways this kind of macro could look. Here’s just one example:

The idea is simple:
OnEnter) runs on entry.WhileActive) is actually a Repeat loop that runs every 250ms as long as the macro remains active.OnExit) takes over to handle any exit logic.In the near future, additional improvements will make creating "Aura-like" macros even easier.
Here’s another example – a macro that waits for deactivation and performs an action only on exit. This mirrors the behavior of an aura with just OnExit.

A whole set of nodes previously exclusive to Behavior Trees is now supported in Macros as well:
Note: The first three nodes (Selector/Sequence/Cooldown) are most useful inside a
Repeatblock — that’s where they shine.
Let’s build a simple rotation with two skills and a basic attack, using macros:

Nothing too special — we check cooldowns, then availability, then cast in order. If skills are unavailable, we fall back to a basic attack.
Now here’s the exact same logic, wrapped inside a macro:

The logic is nearly identical, except now we're building the rotation inside the macro itself with a loop, and using a Selector to control flow.
Side note: Looking at this screenshot, it seems like I went a bit overboard with icons and formatting — it’s a bit too "noisy". I’ll try to clean that up.
Finally — in the foreseeable future, macros will also be editable in a graph view. This feature is still in development, but many users may find it easier to understand and work with macros this way.

New instrument which allows to initialize hotkeys right from scripts.
[Keybind("p")] // Simple example - triggers when 'p' is pressed
[Keybind("Ctrl+2")] // Triggers only when 'Ctrl + 2' is pressed
[Keybind("Ctrl+2", IgnoreModifiers = true)] // Triggers on ANY combination containing 'Ctrl + 2' (e.g., 'Ctrl + Alt + 2')
public void OnKey(){
    Log.Info("Key pressed");
}

[Keybind(Hotkey = "4", SuppressKey = false)] // Handles the key, but it will still pass through to other apps
public void HandleKeyWithInjectedServices(IAuraEventLoggingService loggingService){
    Log.Info("Key pressed");
    loggingService.LogMessage(new AuraEvent(){ Text = "Message", Loglevel = FluentLogLevel.Info });
}
If you're using GetService somewhere in the code - you're already using DI system in EyeAuras.
I've made some improvements in that part which should simplify the scripts
Here is how exactly same script looks like in 3 different forms:
Current approach - get APIs via GetService
var sendInput = GetService<ISendInputScriptingApi>();
sendInput.MouseMoveTo(200, 100); // Moves the mouse to X200 Y100
sendInput.MouseRightClick(); // Performs a right mouse click
Now two new approaches which you could(and should!) start using in your scripts.
I am thinking about automatically injecting current APIs (such as SendInput) into your scripts - this would simplify and generalize the code.
E.g. for ISendInputScriptingApi the name would be SendInput (like in example below), for IPlaySoundScriptingApi - PlaySound, for ComputerVision that could be something like IComputerVisionExperimentalScriptingApi Cv { get; init; }
I will publish this as a separate update.
ISendInputScriptingApi SendInput { get; init; } // Automatically initialized when the script starts

SendInput.MouseMoveTo(200, 100); // Moves the mouse to X200 Y100
SendInput.MouseRightClick(); // Performs a right mouse click
Now
[Dependency] ISendInputScriptingApi SendInput { get; set; }

SendInput.MouseMoveTo(200, 100); // Moves the mouse to X200 Y100
SendInput.MouseRightClick(); // Performs a right mouse click
Это довольно крупное обновление. Появился новый экспериментальный scripting API, который позволяет работать с Computer Vision в EyeAuras вообще без использования Auras.
Достаточно написать всего несколько строк кода — и в вашем распоряжении окажутся все инструменты, которые развивались годами: поиск изображений, поиск по цвету, нейросети и многое другое.
Обратите внимание: API совсем новый, поэтому он еще может меняться. Не говоря уже о возможных багах и шероховатостях — пожалуйста, присылайте свои отчеты.
Вот как может выглядеть работа с новым API. Для начала попробуем найти изображение где-то на экране.
var cv = GetService<IComputerVisionExperimentalScriptingApi>()
    .ForScreen() //search through entire screen, could be ForWindow - see below
    .EnableOsd(fps: 10); //optional, with enabled on-screen-display refreshed @ 10 fps

var position = cv.ImageSearch(targetImagePath);
if (position.IsEmpty)
{
    Log.Info($"Found @ {position}");
} else {
    Log.Info($"Image not found");
}
Вот и все — никаких auras, triggers или actions. Все доступно прямо в этих нескольких строках кода.
Под капотом EyeAuras постарается максимально оптимизировать ваши вызовы: кэшировать изображения, модели, заранее подгружать нужные данные и т. д.
В этой области еще есть куда расти по производительности, но даже текущего состояния уже более чем достаточно для большинства задач.
Вот что доступно уже сейчас:
PixelSearch — можно использовать либо для поиска пикселя определенного цвета/оттенка, либо для проверки, соответствует ли пиксель в конкретной точке ожидаемому цветуImageSearch — просто ищет изображениеTextSearch — распознает текст в указанной области экрана/окна. Пока почти не настраивается, но в ближайшее время возможности будут расширеныMLSearch — получает предсказания от ML-модели; по смыслу этот вызов во многом эквивалентен старому Refresh()OnScreenDisplay (OSD) — если включен, визуализирует каждый вызов этого API прямо на экране. Также можно задать FPS для OSD, чтобы снизить нагрузку на систему; обычно 5-10 FPS более чем достаточно, чтобы видеть, что происходит под капотомAuraIsActiveЭто пример бота, который отслеживает изображение и кликает по нему (на примере AimTrainer).
Что стоит обратить внимание на OSD:
p.s. Здесь все специально замедлено для наглядной демонстрации. При нормальной настройке скрипт может достигать до 60-80 hits/second :D
//this is an example of a script
//which uses image search to find and follow a specific image inside a window
//It uses 2-times probing for optimization - if we know the previous location of the image
//it makes sense to repeat the search in that specific region first

//picking a window
var windowSelector = GetService<IWindowSelector>();
windowSelector.TargetWindow = "Aim Trainer";
var targetWindow = windowSelector.ActiveWindow ?? throw new InvalidOperationException("Window not found");

//this API is used to do Computer Vision stuff (image/text/color/ml search)
var cv = GetService<IComputerVisionExperimentalScriptingApi>()
    .ForWindow(targetWindow)  //for a specific window
    .EnableOsd(fps: 10); //with enabled on-screen-display refreshed @ 10 fps

//this API is used to generate mouse movements
var sendInput = GetService<ISendInputScriptingApi>();
sendInput.TargetWindow = targetWindow; //for a specific window

//could be either local file or URL
var targetImagePath = @"C:\Users\Xab3r\Documents\ShareX\Screenshots\2025-03\uupb4m3RQkfHa8sv.png";

//repeat until script is stopped
while (true)
{
	  //try to find the image
    var position = cv.ImageSearch(targetImagePath);
    if (position.IsEmpty)
    {
        //not found
        continue;
    }

    Log.Info($"Found @ {position}");

    //found the image - moving the mouse to the center and clicking on object
    sendInput.MouseMoveTo(position.Center());
    sendInput.MouseClick();
}
Альтернативно тот же цикл может выглядеть так при использовании нейросети.
ML, скорее, рассчитан на более опытных пользователей. Сейчас метод возвращает «сырые» результаты в виде WindowImageProcessedEventArgs — это дает максимально возможный контроль над извлеченными данными.
//as with the image, model path could be local or could point to remote file
var mlModelPath = @"https://s3.eyeauras.net/media/2025/03/AimLab_20240213193604OOBfW2f00U5K.onnx";
while (true)
{
    //get predictions from the model
    var result = cv.MLSearchRaw(mlModelPath);
    if (!result.Detected.Predictions.Any())
    {
        //not found
        continue;
    }

    var currentPosition = result //WindowImageProcessedEventArgs
      .Detected //get detection results
    	.Predictions //get predictions
    	.First() //more specifically, first one
      .Rectangle //get bounding box of that prediction IN LOCAL(aka World) coordinates
      .Transform(result.ViewportTransforms.WorldToWindow); //transform World coordinates to Window coordinates
    Log.Info($"Found via ML @ {currentPosition}");

    if (!currentPosition.IsEmpty)
    {
        //found the image - moving the mouse to the center
        sendInput.MouseMoveTo(currentPosition.ToWinRectangle().Center());
        sendInput.MouseClick();
    }
}
Вместе с новым API понадобились и более удобные инструменты для работы с ним.
Идея простая: вы используете эти инструменты, чтобы получить значения, которые затем можно сразу вставить в код — например, координаты, цвет, заголовок окна или имя процесса.
Это должно заметно ускорить разработку, особенно для небольших скриптов.
В список входят:

var pixelLocation = cv.PixelSearch(Color.FromArgb(26, 26, 26)); //<- Color.FromArgb(26, 26, 26) inserted by Color selector
var cv = GetService<IComputerVisionExperimentalScriptingApi>().ForWindow("l2.bin"); //<- "l2.bin" inserted by Process selector
cv.MLSearchRaw(mlModelPath, new Rectangle(719, 406, 988, 584)); //<- new Rectangle(719, 406, 988, 584) inserted by Region selector
sendInput.MouseMoveTo(new Point(190, 393)); //<- new Point(190, 393) inserted by Point selector
При работе с координатами не забывайте, что они могут быть либо абсолютными (screen), либо относительными (window). В зависимости от сценария удобнее может быть как один, так и другой вариант.
Новые инструменты поддерживают оба режима — для этого есть два разных типа инструментов, используйте тот, который лучше подходит вашей задаче.

SendInputUnstableScriptingApi в SendInputScriptingApi — почти год без изменений, так что он выглядит достаточно стабильнымPercentage, которую можно использовать, чтобы явно обозначать значения в % (например, 0.1 = 10%)OpacityWorldToWindow — это позволяет очень просто вычислять координаты внутри окна после Refresh()~2-3%) быстрееR и G были перепутаныMajor changes in how EyeAuras manages memory for the images. May make things better, may break everything - we'll see.
For a demonstration purposes and for some quick testing, added selector which allows you to download one of well-known Yolo models, including those which feature Segmentation and Classification. Selector is available only when model is NOT loaded.

E.g. here are results of Yolo 8 Small - Segmentation

and here are results of the latest Yolo 12 Turbo - Small - notice that even Turbo version nowadays not only yields more reliable results, but it also is able to detect more objects(person in the car) on the scene. Thank you, progress :)

When you're using ML model, it usually has hard-coded resolution, e.g. 640x640.
When ML model gets fed with an Image, that image must be resized to accomodate model's resolution - there is no other way around it.
Depending on how the training process is done, usually it is either Letterboxing (adding black bars without changing aspect ration) or Stretching.
Previously, EyeAuras was trying to "guess" the best method depending on model type and version, but this introduced more confusion than helped.
That is why, from now on, default resize method is Stretching and if you want to change that - just throw in Resize effect and pick whichever method fits your model best.
Open Effects window

Added Resize Effect and setup it accordingly to your model resolution/type
